Home Blog

5 Tips For Improving Your WordPress Development Workflow – 2023 Guide

Source: cloudstaff.com

There are almost half a billion WordPress websites nowadays, and this is one of the most popular platforms to build your site on. It is easy to use, and you can also modify and develop your site depending on your needs and knowledge. In this article, we are going to give you some tips on how you can improve your development workflow when using WordPress, and we will tell you how that is going to improve your business and services. Continue reading to learn something new, and to learn how this process will save you a lot of trouble, time, and money in the long run.

1. Never develop on-site

Source: sainiwebexperts.com

One of the biggest mistakes people make is letting their site be a published work in progress. Your clients don’t want to see the stages in which you are developing your WordPress, and they are interested only in seeing the finished result.

Even though it is human, and it is normal to get things done, it is always best to do all the changes and development process off-site. Know that you can create a local environment, test things out, change them, add themes, experiment, and everything else you want to do until you are done. On the same note, you should also do this when making huge changes.

When you use a local environment, you will be able to keep all your data safe, and no matter what happens, your files, blogs, products, and everything else will stay intact. Take your time to learn how to do this, and know that when the whole process is done off-site, you can take your time to finish everything and make it perfect before you publish it on your site.

2. Mobile-friendly websites

Source: atomic74.com

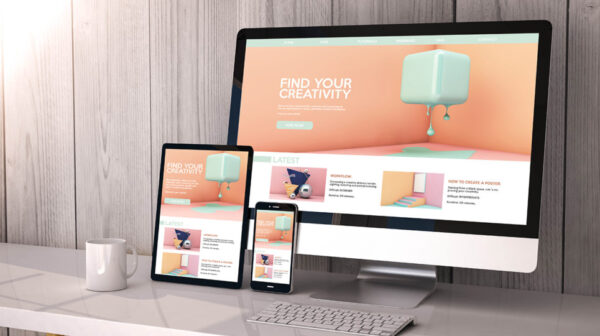
Nowadays, most users use their smart devices to browse the internet, and we want to be able to see everything in a mobile-friendly interface. We don’t want a desktop view on our phone or tablet, and we don’t want to have to zoom in, zoom out, or hope for the best when we click on something.

No matter what type of app you are building, you should be aware that most of your users will use something else than their PC or laptop, so you should give them the best user experience. No matter if it is just the interface, the theme, apps, how the products are listed, or even widgets and additional information, people should be able to browse and read your site without any issues.

Know that when you are using the official WordPress themes, you will be getting a mobile-friendly interface, but if you are developing something on your own, you need to be aware of all the things. Because of this, you should test things out, use different devices, and know that you should also test them on different operating systems.

In addition to this, if you plan on creating your own app, you should pay attention to this as well. According to fyresite.com, an expert company will be able to help you not only with the themes and design, but also with the CMS integration, mobile apps, and even with e-commerce website development.

3. Don’t skip important steps

Source: webleodesign.com

When you are configuring your website, you need to know that there are important steps you need to follow. Doing things correctly will help you and your clients get the things you want. Things need to be in sync with one another, and if one thing is lagging, or not working properly, chances are, it will negatively affect the whole website.

Because of this, you should use an approval environment, and you should test things out off-site. Things may all seem perfect to you, as a developer, but you should also ask others for their opinion. When different sets of eyes see things, you will be able to tackle issues even before they appear. Always have a team who will check if things are working properly, and have a team that will be looking for mistakes and errors.

It is always better to do these things in the production process, and fix issues as they appear than to risk publishing your site, and waiting for users to leave, or report mistakes. Leave it off the air until it is perfect.

4. Don’t fix things that are not broken

Source: tech101.in

Now let’s talk about something we all tend to do – try to improve things that are working perfectly. Yes, we want to give a better experience to our customers, but some things are perfect as they are.

If you created a great WordPress site, and if things are functioning as they are supposed to be, then don’t change them until you want to do a rebranding or make huge changes. Changing minor things here and there can be as bad as they can be good.

When making changes, try to do everything at once, and don’t try to improve everything. Yes, there are a lot of great things on the market, but you don’t need all of them. Focus on what you need on your website and don’t make it too crowded.

5. You don’t have to pay for everything

Source: apptension.com

The last thing we are going to talk about is paying for everything. We are taught that if it costs a lot, it is good, and even though that is true in most cases, it does not mean that you cannot have something great for free.

You can choose to build your own theme free of charge, and you can even sell it later on to make some extra profits. The same goes for apps, interfaces, and CMS. Take your time to improve your skills as a developer, and if you don’t have any skills when it comes to this, know that it is far better to hire one company that will do everything for you than to pay for individual things.

Make sure you establish a flow in your site so that your customers and clients will have no issues navigating through it. Help your team work together, and know that synergy will save you a lot of time and effort.

By following our tips, you will be able to build an amazing site on this platform, and you can easily customize things depending on your need. There is a reason why this is the most popular platform, and it will give you a lot of freedom. By improving your WordPress development workflow, you will improve all the things in your business, so don’t wait until things fall apart to do something about it.

Are Home Swim Spas Worth the Investment – 2023 Guide

Source: swimex.com

It is well-known that one of the best ways to relieve yourself of stress, pain, or problems in the back, neck, or other joints is by going to the spa or by getting a massage. A lot of times even a doctor will send you for such a treatment. The fact is that swimming more relaxing in a spa is actually quite helpful for children, adults and even much older people. But, not everyone has the time or the money to go to a spa which is why to decide to build their own home swim spa.

However, the question is whether such an investment is worth the money. The answer to this question depends entirely on your needs and how much you are willing to invest in such a project.

In my opinion, I think that is a great investment especially for those that suffer from chronic pain in the back or neck or are constantly under stress. Having the freedom to enter the water, relax, and just get rid of all that stress any day of the week is quite the benefit.

To help you determine whether the investment is worth it for your situation, I decided to write this article and give you a few advantages that you should probably consider.

A long-term investment

Source: thehottubandswimspacompany.com

I understand that even the cheapest home swim spa models do not come at a cheap price. The cheapest and most basic models are probably priced summer around $5000. It is not a huge amount, but it is still quite a sum. With that kind of cash, you could probably buy a nice second-hand car.

However, everyone has different priorities, so if you believe that you need everyday relaxation and treatment from a swim spa, I say go ahead and make that investment.

For those that are still hesitating, I have to remind you that this is going to be a long-term investment. Even the most basic models should last you well over 5 years or even 10 years. If you decide to spend a little bit more money, summer around $10,000, you are probably going to end up with a product that is going to last you well over 10 years.

In other words, you will be reaping the benefits of a spa for an entire decade. Everyone else in your family could also see benefits from it.

Aesthetically pleasing

Source: swimex.com

I think that many people have the wrong image of how a swim spa actually looks like. They probably think that it is going to look out of place in a backyard or on the deck. However, I do not think that is the case because most of the modern spa models are made to be easily combined with any backyard. If the hot tub or a swimming pool can look great in a backyard, why would not a swim spa look just as good?

In fact, I believe that some models are even much better looking than a regular hot tub or swimming pool. They are quite aesthetically pleasing, making your backyard seem even more attractive than it already is. You also have to consider they are much more compact which is quite important if you have a smaller backyard as suggested by compasspools-sydney.

It can also be fun

Source: swimex.com

If you believe that a swim spa can only be used for treatment or as a remedy for pain or stress, you are wrong. You can enjoy this product anyway you want. Even if you have managed to completely get rid of all your medical problems, you could still have some fun in it.

You can always invite friends or family members and just enjoy your time in the backyard while relaxing in the water. You can keep the water cold or you can warm it up to a comfortable level. You could also use it as a sort of a hot tub.

In the hot summer days, you could also dip into it with your kids to cool off. Basically, there are a lot of uses for a swim spa, it is not limited in any way.

Much easier to install than other alternatives

Source: prestigepoolsandspas.com

You probably already know how installing a swimming pool can look like. The entire project cost thousands of dollars and requires you to dedicate a month or two of your time. You also have to forget about using the backyard because it is going to be occupied by workers and materials all the time.

However, when installing a swim spa, the entire process is very simple and so much quicker. If you hire the right professional, they could probably be done in just a few days.

Usually, the entire product is already complete and it is delivered that way. In other words, it just needs to be plugged in and it can be used. The only thing that needs to be done is to make sure that the installation has been previously done in the backyard. That is about it. No need for extensive digging, installing complicated pump systems, canals, or anything like that. Many would refer to the installation process as plug-and-play.

Improves the value of your home

Source: prestigepoolsandspas.com

As you said previously, the swim spa units do not come at a cheap price. It is not a lot of money, but it is still not something that you can completely ignore. It is a long-term investment. This is why a lot of people are worried that their investment is going to be worthless after a few years.

However, you do not have to worry about that because this investment will considerably improve the value of your home. If you are ever

If you are ever thinking about selling your house, you will be glad to know that you will be able to sell it at a much higher price. Basically, you will even get your money back which you spent on the swim spa.

As you can see, there are quite a few reasons why you should get a swim spa for your home. In the end, it is up to you to decide whether the investment is truly worth it.

7 Useful Home Appliance Care And Maintenance Tips – 2023 Guide

Source: idealhome.co.uk

Let’s be honest, a wide range of home appliances have made our lives so much better and easier. In fact, most people wouldn’t be able to go a day without one of these devices – coffee maker, I’m looking at you – meaning that we’re all, in some way, dependent on them. However, there is one thing that most individuals often overlook, maintaining, and caring for their appliances.

After all, every single device in your home is an investment, which is why you must ensure that you regularly and properly maintain them. Fortunately for all individuals that are wondering how they can care for their appliances, this article can help. So, without further ado, let’s take a look at some useful home appliance care and maintenance tips:

1. The Refrigerator Coils Must Be Cleaned

Source: realtor.com

If your fridge stops working on a summer day, you should look at the coils. In most cases, they get obstructed which causes the fridge to shut down. In order for it to function properly, you must clean them. On most models, you’ll be able to reach the coils by removing the front panel. To clean them, you’ll need a coil brush – which you can purchase in most hardware stores.

The first step is to push the brush back and forth into the coils. Once you pull it out, use a vacuum to clean the brush. Now, if they are located in the back, pull out the fridge and repeat the same process. Besides ensuring that your device functions well, it’ll also be able to cool more efficiently, meaning that you can save money on your electricity bills.

2. Don’t Overload You Washing And Drying Machines

Although most people think that overloading their washing and drying machines will save them time, electricity, and water, this is not entirely true. In fact, if you overload it frequently, it could easily cause damage to the moving parts, including all the belts and motors. Some of the repairs can cost you a lot of money and in some cases, the damage can be so extensive that people need to buy new devices. Hence, ensure that you only load the recommended weight.

3. Your Dishwasher Must Remain Clean

Source: goodhousekeeping.com

If you noticed that your dishes aren’t as clean as they used to be when you remove them from the dishwasher, the filter is most likely filled with food residue. If it is, in fact, clogged, the water cannot reach the spray arms, meaning that it won’t be able to clean the items in the rack.

Now, it’s not difficult to fix this problem and it’ll only take 5 minutes of your time. Firstly, check the user manual in order to determine where the filter is located and once you do, you should remove the filter cover. Once you do, you should use a wet/dry vacuum and clean it. If it’s sticky, you should clean it with water.

4. Inspect All The Hoses Connected to Your Devices

Your dishwasher and washing machine are only some of the devices that have hoses, which is why you must ensure that you regularly examine for any leaks in the hoses. If you notice that there are some wear and tear, you’ll have to replace the hose as soon as you possibly can, especially since it can cause further damage to the device and surrounding area.

Now, you could choose to replace it by yourself, but in some cases, it can get relatively tricky. Hence, if your unsure of how you can replace the hoses connected to your appliances, it might be best to opt for a professional service such as Prominence Support that specializes in home appliance maintenance.

5. The Stove Spills Need to Be Washed

Source: appliancecareusa.com

If your stove burner doesn’t want to switch on, it’s possible that spilled food is to blame. In this case, you should use a smaller brush or a toothbrush to clean all the food debris from the igniter. If you have an electronic ignition stove, there will probably be a small ceramic plate located on the top or under the seal plate, which you need to ensure that is placed properly on the burner.

6. The AC Filter Needs to Be Clean

Dirty filters will definitely restrict the airflow of your air conditioner, which means that it’ll reduce how efficient your device is. Hence, you must clean the filter every two to three weeks, however, this will depend on how often you use it. Generally, the more you use it, the more often you’ll need to clean the filter out.

In order to clean it, you should begin by removing the front panel of the device. If you have a reusable filter, you can simply vacuum it in order to remove all the dust and dirt. On the other hand, if the filter is disposable, you should replace it, return the panel, and you’ll be good to go.

7. The Oven Door Needs to Close Properly

Source: youtube.com

You must ensure that your oven door has a tight seal. Why should you do this? Well, if it doesn’t close and seals properly, the appliance will lose more than 25 percent of its heat, which means that it won’t be energy efficient and your meals won’t cook evenly, and it’ll take longer for it to be done.

To check whether or not it seals properly, you should open the door and locate the rubber gasket, most commonly positioned around the door borders. When you do, you should inspect it doe any damaged, broken, or deformed areas, and you should also shut the door to see if there are some leaks. If you do find it, replace the seal.

Conclusion

In order for you to ensure that your home appliance functions properly and that it lasts longer, you’ll have to maintain them regularly and properly. And, if you choose to follow some or most of the tips mentioned in the article above, you’ll be able to save yourself from a lot of expensive problems later on.

So, now that you’re aware of all the things you should definitely do, you shouldn’t waste any more of your time. Instead, you should return to the beginning of this article, and then start checking each of your devices in order to see if they need to be maintained or fixed.

Uninstall and Remove AMD Step by Step 2023 Guide

windows7 regedit

Do you need to uninstall AMD OverDrive to fix some problems? Are you looking for an effective solution to completely delete all files from your PC? Don’t worry about it. This page contains detailed instructions for completely deleting AMD OverDrive.

Possible problems removing the AMD OverDrive.

* AMD OverDrive is not listed in the Programs and Features section
* You do not have sufficient access to uninstall AMD OverDrive.
* The file needed to complete the uninstallation could not be started.
* There’s been a mistake. Not all files have been successfully deleted.
* Another process that uses the file prevents AMD OverDrive from being deleted.
* AMD OverDrive files and folders are stored on the hard drive after deletion.

The installation of AMD OverDrive is not possible due to many other problems. Insufficient installation of the AMD OverDrive can also cause many problems. It is therefore very important to completely erase AMD OverDrive and delete all files.

How do I completely remove the AMD OverDrive?

Method 1: Uninstall the AMD drive via programs and functions.

When a new part of the program is installed on your system, the program is added to the list under Programs and Features. If you want to uninstall a program, you can go to the section Programs and Features. So, if you want to uninstall AMD OverDrive, the first solution is to uninstall AMD OverDrive using programs and functions.

Steps:

a. Open programs and functions.

Windows Vista and Windows 7

Press Start, type Uninstall program in the Search for programs and files , and then click on the result.

Delete search7

Windows 8, Windows 8.1 and Windows 10.

Open the WinX menu by holding the buttons Windows and X together and then pressing Programs and Functions.

Win X 10 menu window

b. Look in the AMD OverDrive list, click it and then click the Remove button to start the removal.

delete

Method 2: Remove the AMD drive with the file uninstaller.exe

Most computer programs have an executable file called uninst000.exe or uninstall.exe or something similar. These files are located in the installation directory of AMD OverDrive.

Steps:

a. Navigate to the installation directory of AMD OverDrive.

b. Locate the file uninstallation.exe or uninstallation000.exe.

unis000

c. Double click on the uninstaller and follow the instructions of the AMD OverDriveuninstaller wizard.

Method 3: Remove the AMD drive via System Restore.

System Restore is a utility provided with the Windows operating system that helps computer users restore the system to its previous state and remove programs that interfere with the operation of the computer. If you created a System Restore Point before installing the program, you can use System Restore to restore the system and completely destroy unwanted programs such as AMD OverDrive. Before you perform a system restore, you need to back up your personal files and data.

Steps:

a. Close all open files and programs.

b. On the desktop, right-click Computer and select Properties. The system window is displayed.

c. Click on the System Protection button on the left side of the system window. The System Properties window is displayed.

System protection

d. Click on System Restore and the System Restore window will open.

System restoration

e. Select another restore point, and then select Next.

Restore files and system configurations

f. Select a date and time from the list and press Next. Please note that programs and drivers installed after the selected date and time may not work properly and may need to be reinstalled.

Target recovery point

Click Done when the Restore Point Confirmation window appears.

Validate the recovery point

Nine o’clock. Click Yes to reconfirm.

7 Confirmation of the restoration of the window 7 Confirmation of the restoration

Method 4: Remove the AMD drive with an antivirus program.

Today, malware resembles normal computer applications, but it is much more difficult to remove it from a computer. These malicious programs infiltrate the computer using Trojans and spyware. Other malware, such as adware or potentially unwanted programs, are also very difficult to remove. They are usually installed in your system with free software such as videos, games or PDF converters. You can easily bypass the detection of antivirus programs in your system. If you cannot remove AMD OverDrive like other programs, it is worth checking if it is malicious or not. Click on this tool and download it to scan it for free.

Method 5: ReinstallAMD OverDrive to uninstall it.

If the file required to delete AMD OverDrive is damaged or missing, the program will not be able to delete it. In this case, a new installation of AMD OverDrive may help. Run the installation program on the original drive or in the startup file to reinstall the program. Sometimes you can use the installer to restore or uninstall the program.

Method 6: Use the deletion command displayed in the registry.

When the program is installed on your computer, Windows stores the settings and information in the registry, including the command to uninstall the program. You can try this method to delete AMD OverDrive. Please change the register carefully as any error can lead to a system error.

Steps:

a. Press and hold the Windows and R keys to open the Run command, type regedit in the field and press OK.

windows7 regedit

b. Go to the following registration key and locate the AMD OverDrive key:

HKEYY_LOCAL_MACHINE_SOFTWARE_Microsoft manifold.

c. Double-click the UninstallString value and copy the data from the value.

De-installation

d. Press and hold the Windows and R keys to open the Run command, paste the value data into the field and click OK.

e. Follow the instructions in the wizard to remove AMD OverDrive.

Method 7: Removes the excess AMD disk with an external removal program.

Manually deleting AMD OverDrive requires computer knowledge and patience. And no one can promise that a manual uninstallation will completely uninstall AMD OverDrive and erase all files. And an incomplete uninstallation results in many unnecessary and invalid entries in the registry and has a negative effect on the performance of your computer. Too many unwanted files also take up free space on your hard drive and slow down your PC. It is recommended that you uninstall AMD OverDrive using a reliable external uninstaller that can scan your system, identify all AMD OverDrive files, and delete them completely. Download this powerful third party remover below.

Uninstall and Remove BattlEye from OA Uninstall Step by Step 2023 Guide

windows7 regedit

Do you need to uninstall BattlEye for OA Uninstall to fix some issues? Are you looking for an effective solution to completely delete all files from your PC? Don’t worry about it. On this page you will find detailed instructions on how to completely uninstall BattlEye for OA Uninstall.

Possible problems removing BattlEye for OAde-installation

* BattlEye for OA Uninstall is not listed under Programs and Features.
* You don’t have enough access to the BattlEye uninstaller to uninstall OA.
* The file needed to complete the uninstallation could not be started.
* There’s been a mistake. Not all files have been successfully deleted.
* Another process using the file stops the removal of BattlEye for OA Uninstall.
* BattlEye for OA uninstall files and folders are on your hard drive after removal.

BattlEye for OA Uninstall cannot be uninstalled due to many other problems. Insufficient removal of the BattlEye to eliminate osteoarthritis can also cause many problems. It is therefore very important to completely remove BattlEye for OA and delete all its files.

How can I completely remove BattlEye for osteoarthritis?

Method 1: BattlEye for OA Delete with programs and functions.

When a new part of the program is installed on your system, the program is added to the list under Programs and Features. If you want to uninstall a program, you can go to the section Programs and Features. So, if you want to uninstall BattlEye for OA Uninstall, the first solution is to perform the removal using programs and functions.

Steps:

a. Open programs and functions.

Windows Vista and Windows 7

Press Start, type Uninstall program in the Search for programs and files , then click on the result.

Delete search7

Windows 8, Windows 8.1 and Windows 10.

Open the WinX menu by holding the buttons Windows and X together and then pressing Programs and Functions.

Win X 10 menu window

b. Find and click on the BattlEye for OA removal list and then click the Remove button to start the removal.

delete

Method 2: BattlEye for OA Uninstall BattlEye for OA with uninstaller.exe

Most computer programs have an executable file called uninst000.exe or uninstall.exe or something similar. These files are located in the installation directory of BattlEye for OA Uninstall.

Steps:

a. Access to the BattlEye installation directory to uninstall OA.

b. Locate the file uninstallation.exe or uninstallation000.exe.

unis000

c. Double click on the uninstaller and follow the instructions in the BattlEye OA Uninstaller Wizard.

Method 3: Remove BattlEye for OA Delete via System Restore.

System Restore is a utility provided with the Windows operating system that helps computer users restore the system to its previous state and remove programs that interfere with the operation of the computer. If you created a System Restore Point before installing the program, System Restore allows you to restore the system and completely destroy unwanted programs such as BattlEye for OA Uninstall. Before you perform a system restore, you need to back up your personal files and data.

Steps:

a. Close all open files and programs.

b. On the desktop, right-click Computer and select Properties. The system window is displayed.

c. Click on the System Protection button on the left side of the system window. The System Properties window is displayed.

System protection

d. Click on System Restore and the System Restore window will open.

System restoration

e. Select another restore point, and then select Next.

Restore files and system configurations

f. Select a date and time from the list and press Next. Please note that programs and drivers installed after the selected date and time may not work properly and may need to be reinstalled.

Target recovery point

Click Done when the Restore Point Confirmation window appears.

Validate the recovery point

Nine o’clock. Click Yes to reconfirm.

7 Confirmation of the restoration of the window 7 Confirmation of the restoration

Method 4: Remove BattlEye for OA Remove with an antivirus.

Today, malware resembles normal computer applications, but it is much more difficult to remove it from a computer. These malicious programs infiltrate the computer using Trojans and spyware. Other malware, such as adware or potentially unwanted programs, are also very difficult to remove. They are usually installed in your system with free software such as videos, games or PDF converters. You can easily bypass the detection of antivirus programs in your system. If you cannot delete BattlEye for OA like other programs, it is useful to check if it is malicious or not. Click on this tool and download it to scan for free

Method 5: Reinstall BattlEye for OA to uninstall it.

If the file needed to delete BattlEye for OA is damaged or missing, the program cannot be removed. In this case, a new installation of BattlEye for OA Uninstall may be useful. Run the installation program on the original drive or in the startup file to reinstall the program. Sometimes you can use the installer to restore or uninstall the program.

Method 6: Use the deletion command displayed in the registry.

When the program is installed on your computer, Windows stores the settings and information in the registry, including the command to uninstall the program. You can try this method to uninstall BattlEye for OA Uninstall. Please change the register carefully as any error can lead to a system error.

Steps:

a. Press and hold the Windows and R keys to open the Run command, type regedit in the field and press OK.

windows7 regedit

b. Go to the following registration key and find one of the BattlEye for OA Uninstall:

HKEY_LOCAL_MACHINE_SOFTWARE_Microsoftraam…

c. Double-click the UninstallString value and copy the data from the value.

De-installation

d. Press and hold the Windows and R keys to open the Run command, paste the value data into the field and click OK.

e. Follow the instructions in the wizard to remove BattlEye for OA.

Method 7: Uninstall BattlEye to remove OA using an external uninstaller.

Manually uninstalling BattlEye for OA Uninstall requires computer knowledge and patience. And no one can promise that a manual deletion of BattlEye for OA will be completely deleted and all files will be deleted. And an incomplete uninstallation results in many unnecessary and invalid entries in the registry and has a negative effect on the performance of your computer. Too many unwanted files also take up free space on your hard drive and slow down your PC. Therefore, it is recommended to remove the BattlEye for OA with a trusted third party uninstaller who can scan the system, identify all BattlEye for OA files and remove them completely. Download this powerful third party remover below.

Uninstall and Delete BgInfo 4.16 Step by Step 2023 Guide

De-installation

Do you need to delete BgInfo 4.16 to solve some problems? Are you looking for an effective solution to completely delete all files from your PC? Don’t worry about it. This page contains detailed instructions for the complete removal of BgInfo 4.16.

Possible problems when removing BgInfo 4.16

* BgInfo 4.16 is not listed in the section Programs and Functions.
* You don’t have enough access to delete BgInfo 4.16.
* The file needed to complete the uninstallation could not be started.
* There’s been a mistake. Not all files have been successfully deleted.
* Another process using the file terminates the deletion of BgInfo 4.16.
* BgInfo 4.16 files and folders are on your hard disk after deletion.

BgInfo 4.16 cannot be removed due to many other problems. Insufficient removal of BgInfo 4.16 can also cause many problems. It is therefore very important to remove BgInfo 4.16 completely and delete all files.

How do I delete BgInfo 4.16 Completeness?

Method 1: Remove BgInfo 4.16 from programs and functions.

When a new part of the program is installed on your system, the program is added to the list under Programs and Features. If you want to uninstall a program, you can go to the section Programs and Features. So, if you want to uninstall BgInfo 4.16, the first solution is to uninstall BgInfo 4.16 via programs and functions.

Steps:

a. Open programs and functions.

Windows Vista and Windows 7

Press Start, type Uninstall program in the Search for programs and files , and then click on the result.

Delete search7

Windows 8, Windows 8.1 and Windows 10.

Open the WinX menu by holding the buttons Windows and X together and then pressing Programs and Functions.

Win X 10 menu window

b. Find BgInfo 4.16 in the list, click on it and then click Remove to start the removal.

delete

Method 2: Uninstall BgInfo 4.16 with uninstaller.exe

Most computer programs have an executable file called uninst000.exe or uninstall.exe or something similar. You can find these files in the BgInfo 4.16 installation folder.

Steps:

a. Navigate to the BgInfo 4.16 installation folder..

b. Locate the file uninstallation.exe or uninstallation000.exe.

unis000

c. Double click on the uninstaller and follow the instructions in the BgInfo 4.16 Uninstaller Wizard..

Method 3: Remove BgInfo 4.16 via System Recovery.

System Restore is a utility provided with the Windows operating system that helps computer users restore the system to its previous state and remove programs that interfere with the operation of the computer. If you have created a System Restore Point before installing the program, you can use System Restore to restore the system and completely destroy unwanted programs such as BgInfo 4.16. Before you perform a system restore, you need to back up your personal files and data.

Steps:

a. Close all open files and programs.

b. On the desktop, right-click Computer and select Properties. The system window is displayed.

c. Click on the System Protection button on the left side of the system window. The System Properties window is displayed.

System protection

d. Click on System Restore and the System Restore window will open.

System restoration

e. Select another restore point, and then select Next.

Restore files and system configurations

f. Select a date and time from the list and press Next. Please note that programs and drivers installed after the selected date and time may not work properly and may need to be reinstalled.

Target recovery point

Click Done when the Restore Point Confirmation window appears.

Validate the recovery point

Nine o’clock. Click Yes to reconfirm.

7 Confirmation of the restoration of the window 7 Confirmation of the restoration

Method 4: Remove BgInfo 4.16 with antivirus.

Today, malware resembles normal computer applications, but it is much more difficult to remove it from a computer. These malicious programs infiltrate the computer using Trojans and spyware. Other malware, such as adware or potentially unwanted programs, are also very difficult to remove. They are usually installed in your system with free software such as videos, games or PDF converters. You can easily bypass the detection of antivirus programs in your system. If you cannot remove BgInfo 4.16 like other programs, it is useful to check if it is malicious or not. Click on this tool and download it to scan for free

Method 5: BgInfo 4.16 reinstall to remove it.

If the file needed to delete BgInfo 4.16 is damaged or missing, the program cannot be deleted. In this case, a new installation of BgInfo 4.16 may help. Run the installation program on the original drive or in the startup file to reinstall the program. Sometimes you can use the installer to restore or uninstall the program.

Method 6: Use the deletion command displayed in the registry.

When the program is installed on your computer, Windows stores the settings and information in the registry, including the command to uninstall the program. You can try this method to delete BgInfo 4.16. Adjust the register carefully, because any error can lead to a system error.

Steps:

a. Press and hold the Windows and R keys to open the Run command, type regedit in the field and press OK.

windows7 regedit

b. Go to the following registration key and search for one of the BgInfo 4.16:

HKEY_LOCAL_MACHINE_SOFTWARE_Microsoftraam…

c. Double-click the UninstallString value and copy the data from the value.

De-installation

d. Press and hold the Windows and R keys to open the Run command, paste the value data into the field and click OK.

e. Follow the wizard to uninstall BgInfo 4.16..

Method 7: Uninstall BgInfo 4.16 with an external uninstaller.

Manually installing BgInfo 4.16 requires computer knowledge and patience. And no one can promise that a manual uninstallation will completely uninstall BgInfo 4.16 and erase all files. In addition, incomplete uninstallation results in many unnecessary and invalid registry entries and has a negative effect on the performance of your computer. Too many unwanted files also take up free space on your hard drive and slow down your PC. It is therefore recommended to uninstall BgInfo 4.16 with a trusted third party uninstaller that can scan your system, identify all BgInfo 4.16 files and remove them completely. Download this powerful third party remover below.

Uninstall and Remove Directx 11 Step by Step 2023 Guide

De-installation

Do you need to uninstall Directx 11 to fix some problems? Are you looking for an effective solution to completely delete all files from your PC? Don’t worry about it. This page contains detailed instructions for completely deleting Directx 11.

Possible problems removing Directx 11

*Directx 11 is not included in the Programs and Features section.
* You don’t have enough access to delete Directx 11.
* The file needed to complete the uninstallation could not be started.
* There’s been a mistake. Not all files have been successfully deleted.
* Another process that uses the file will stop the deletion of directx 11.
* Directx 11 files and folders can be found on your hard disk after deletion.

Directx 11 cannot be removed because of many other problems. Insufficient removal of Directx 11 can also cause many problems. It is therefore very important to completely delete directx 11 and delete all files.

How do I remove Directx 11 Completley?

Method 1: Removing Directx 11 through programs and functions.

When a new part of the program is installed on your system, the program is added to the list under Programs and Features. If you want to uninstall a program, you can go to the section Programs and Features. So, if you want to uninstall Directx 11, the first solution is to uninstall it using programs and functions.

Steps:

a. Open programs and functions.

Windows Vista and Windows 7

Press Start, type Uninstall program in the Search for programs and files , and then click on the result.

Delete search7

Windows 8, Windows 8.1 and Windows 10.

Open the WinX menu by holding the buttons Windows and X together and then pressing Programs and Functions.

Win X 10 menu window

b. Search the list for Directx 11, click it and then click Uninstall to start uninstalling.

delete

Method 2: Removing directx 11 with its uninstaller.exe

Most computer programs have an executable file called uninst000.exe or uninstall.exe or something similar. You can find these files in the Directx 11 installation directory.

Steps:

a. Navigate to the Directx 11 installation directory.

b. Locate the file uninstallation.exe or uninstallation000.exe.

unis000

c. Double-click the uninstaller program and follow the instructions in Directx Uninstaller Wizard 11.

Method 3: Uninstall 11 directly via System Restore.

System Restore is a utility provided with the Windows operating system that helps computer users restore the system to its previous state and remove programs that interfere with the operation of the computer. If you created a System Restore Point before installing the program, you can use System Restore to restore the system and completely destroy unwanted programs such as Directx 11. Before you perform a system restore, you need to back up your personal files and data.

Steps:

a. Close all open files and programs.

b. On the desktop, right-click Computer and select Properties. The system window is displayed.

c. Click on the System Protection button on the left side of the system window. The System Properties window is displayed.

System protection

d. Click on System Restore and the System Restore window will open.

System restoration

e. Select another restore point, and then select Next.

Restore files and system configurations

f. Select a date and time from the list and press Next. Please note that programs and drivers installed after the selected date and time may not work properly and may need to be reinstalled.

Target recovery point

Click Done when the Restore Point Confirmation window appears.

Validate the recovery point

Nine o’clock. Click Yes to reconfirm.

7 Confirmation of the restoration of the window 7 Confirmation of the restoration

Method 4: Remove Directx 11 with antivirus.

Today, malware resembles normal computer applications, but it is much more difficult to remove it from a computer. These malicious programs use Trojans and spyware to infiltrate the computer. Other malware, such as adware or potentially unwanted programs, are also very difficult to remove. They are usually installed in your system with free software such as videos, games or PDF converters. You can easily bypass the detection of antivirus programs in your system. If you cannot remove directx 11 like other programs, it is useful to check whether it is malware or not. Click on this tool and download it to scan for free

Method 5: Reinstall right 11 to remove it.

If the file needed to delete directx 11 is damaged or missing, the program cannot be deleted. Under these circumstances, a new installation of Directx 11 may be useful. Run the installation program on the original drive or in the startup file to reinstall the program. Sometimes you can use the installer to restore or uninstall the program.

Method 6: Use the deletion command displayed in the registry.

When the program is installed on your computer, Windows stores the settings and information in the registry, including the command to uninstall the program. You can try this method of deleting Directx 11. Please change the register carefully as any error can lead to a system error.

Steps:

a. Press and hold the Windows and R keys to open the Run command, type regedit in the field and press OK.

windows7 regedit

b. Go to the following registration key and find one of Directx 11:

HKEYY_LOCAL_MACHINE_SOFTWARE_Microsoft manifold.

c. Double-click the UninstallString value and copy the data from the value.

De-installation

d. Press and hold the Windows and R keys to open the Run command, paste the value data into the field and click OK.

e. Follow the instructions of the wizard to remove Directx 11.

Method 7: Uninstall Directx 11 with an external uninstaller.

Manual removal of Directx 11 requires computer skills and patience. And no one can promise that a manual uninstallation directx 11 will completely delete all files. And an incomplete uninstallation results in many unnecessary and invalid entries in the registry and has a negative effect on the performance of your computer. Too many unwanted files also take up free space on your hard drive and slow down your PC. It is therefore advisable to delete directx 11 with a trusted third party who can scan your system, identify all directx 11 files and delete them completely. Download this powerful third party remover below.

Uninstall and Remove Eurodict Spanish Dictionary 3.1 Step by Step 2023 Guide

De-installation

Do you need to delete Eurodict Spanish Dictionary 3.1 to fix some problems? Are you looking for an effective solution to completely delete all files from your PC? Don’t worry about it. On this page you will find detailed instructions on how to completely remove Eurodict 3.1 from the Spanish dictionary.

Possible problems in deleting the Eurodict 3.1 Spanish-Bulgarian dictionary

*The Spanish-Bulgarian Eurodict 3.1 dictionary is not listed in the Programs & Features section.
* You do not have sufficient access to delete the Spanish-Bulgarian dictionary Eurodict 3.1.
* The file needed to complete the uninstallation could not be started.
* There’s been a mistake. Not all files have been successfully deleted.
* Another process using the file will stop the deletion of the Eurodict 3.1 Spanish dictionary.
* The files and folders of the Spanish-Bulgarian Eurodict 3.1 dictionary are on your hard drive after deletion.

The Spanish Eurodict 3.1 dictionary cannot be deleted because of many other problems. Insufficient deletion of the Spanish-Bulgarian Eurodict 3.1 dictionary can also cause many problems. It is therefore very important to completely delete the Spanish dictionary Eurodict 3.1 and delete all files.

How do I delete the Spanish dictionary Eurodict 3.1 Completeness?

Method 1: Delete the Eurodict 3.1 Spanish dictionary of programs and functions.

When a new part of the program is installed on your system, the program is added to the list under Programs and Features. If you want to uninstall a program, you can go to the section Programs and Features. So, if you want to delete the Spanish dictionary Eurodict 3.1, the first solution is to uninstall it using programs and functions.

Steps:

a. Open programs and functions.

Windows Vista and Windows 7

Press Start, type Uninstall program in the Search for programs and files , and then click on the result.

Delete search7

Windows 8, Windows 8.1 and Windows 10.

Open the WinX menu by holding the buttons Windows and X together and then pressing Programs and Functions.

Win X 10 menu window

b. Browse to the Eurodict 3.1 Spanish dictionary, click on it and then click Remove to start the uninstall process.

delete

Method 2: Removing the Eurodict 3.1 Spanish dictionary with its uninstaller.exe.

Most computer programs have an executable file called uninst000.exe or uninstall.exe or something similar. You can find these files in the installation folder of the Bulgarian Spanish dictionary Eurodict 3.1.

Steps:

a. Go to the installation directory of the Spanish-Bulgarian Eurodict 3.1 dictionary.

b. Locate the file uninstallation.exe or uninstallation000.exe.

unis000

c. Double click on the uninstaller and follow the instructions in the wizard to uninstall the Eurodict 3.1 Spanish-Bulgarian dictionary.

Method 3: Eurodict 3.1 Removal of the Spanish dictionary through system restoration

System Restore is a utility provided with the Windows operating system that helps computer users restore the system to its previous state and remove programs that interfere with the operation of the computer. If you have created a system restore point before you install the program, you can use the system restore to restore the system and completely destroy unwanted programs, such as the Spanish dictionary Eurodict 3.1. Before you perform a system restore, you need to back up your personal files and data.

Steps:

a. Close all open files and programs.

b. On the desktop, right-click Computer and select Properties. The system window is displayed.

c. Click on the System Protection button on the left side of the system window. The System Properties window is displayed.

System protection

d. Click on System Restore and the System Restore window will open.

System restoration

e. Select another restore point, and then select Next.

Restore files and system configurations

f. Select a date and time from the list and press Next. Please note that programs and drivers installed after the selected date and time may not work properly and may need to be reinstalled.

Target recovery point

Click Done when the Restore Point Confirmation window appears.

Validate the recovery point

Nine o’clock. Click Yes to reconfirm.

7 Confirmation of the restoration of the window 7 Confirmation of the restoration

Method 4: Remove the Eurodict 3.1 Spanish dictionary with an antivirus program.

Today, malware resembles normal computer applications, but it is much more difficult to remove it from a computer. These malicious programs use Trojans and spyware to infiltrate the computer. Other malware, such as adware or potentially unwanted programs, are also very difficult to remove. They are usually installed in your system with free software such as videos, games or PDF converters. You can easily bypass the detection of antivirus programs in your system. If you cannot delete the Eurodict 3.1 Spanish dictionary like other programs, it is useful to check if it is malicious or not. Click on this tool and download it to scan for free

Method 5: Reinstall Eurodict 3.1 Spanish dictionary for uninstallation

If the file needed to delete the Eurodict 3.1 Spanish dictionary is damaged or missing, the program cannot be deleted. In this case, a new installation of the Spanish-Bulgarian Eurodict dictionary 3.1 may be useful. Run the installation program on the original drive or in the startup file to reinstall the program. Sometimes you can use the installer to restore or uninstall the program.

Method 6: Use the deletion command displayed in the registry.

When the program is installed on your computer, Windows stores the settings and information in the registry, including the command to uninstall the program. You can try this method to delete the Eurodict 3.1 Spanish dictionary. Please adjust the register carefully as any error can lead to a system error.

Steps:

a. Press and hold the Windows and R keys to open the Run command, type regedit in the field and press OK.

windows7 regedit

b. Go to the following registration key and find one of the Spanish-Bulgarian Eurodict 3.1 dictionaries:.

HKEY_LOCAL_MACHINE_SOFTWARE_Microsoftraam…

c. Double-click the UninstallString value and copy the data from the value.

De-installation

d. Press and hold the Windows and R keys to open the Run command, paste the value data into the field and click OK.

e. Follow the instructions of the wizard to delete the Eurodict 3.1 Spanish-Bulgarian dictionary.

Method 7: Removal of the Eurodict 3.1 Spanish dictionary using a third party uninstaller.

Manually deleting the Eurodict 3.1 Spanish dictionary requires computer knowledge and patience. And no one can promise that a manual deletion will completely delete the Spanish dictionary Eurodict 3.1 and delete all files. And an incomplete uninstallation results in many unnecessary and invalid entries in the registry and has a negative effect on the performance of your computer. Too many unwanted files also take up free space on your hard drive and slow down your PC. It is therefore recommended to delete the Spanish-Bulgarian 3.1 dictionary with the help of a trusted third party deleteer who can scan your system, identify all the files in the Spanish-Bulgarian 3.1 dictionary and delete them completely. Download this powerful third party remover below.

Uninstall and Remove Guild Wars 2 Step by Step 2023 Guide

windows7 regedit

Do you need to remove Guild Wars 2 to solve some problems? Are you looking for an effective solution to completely delete all files from your PC? Don’t worry about it. On this page, you will find detailed instructions on how to completely remove Guild Wars 2.

Possible problems removing Guild Wars 2

* Guild Wars 2 is not listed in the Programs and Features section.
* You don’t have enough access to remove Guild War 2.
* The file needed to complete the uninstallation could not be started.
* There’s been a mistake. Not all files have been successfully deleted.
* Another process that uses the file will stop the uninstallation of Guild Wars 2.
* Guild Wars 2 files and folders are on your hard drive after deletion.

Guild Wars 2 cannot be solved because of many other problems. Insufficient de-installation of Guild War 2 can also cause many problems. It is therefore very important to completely delete Guild Wars 2 and delete all files.

How to remove Guild Wars 2 Exit

Method 1: Elimination of Guild Wars 2 with programs and functions.

When a new part of the program is installed on your system, the program is added to the list under Programs and Features. If you want to uninstall a program, you can go to the section Programs and Features. So if you want to uninstall Guild Wars 2, the first solution is to uninstall Guild Wars 2 using programs and features.

Steps:

a. Open programs and functions.

Windows Vista and Windows 7

Press Start, type Uninstall program in the Search for programs and files , then click on the result.

Delete search7

Windows 8, Windows 8.1 and Windows 10.

Open the WinX menu by holding the buttons Windows and X together and then pressing Programs and Functions.

Win X 10 menu window

b. Find Guild Wars 2 in the list, click on it and then click Remove to start the removal process.

delete

Method 2: Removing Guild Wars 2 with uninstaller.exe.

Most computer programs have an executable file called uninst000.exe or uninstall.exe or something similar. You can find these files in the Guild Wars 2 installation folder.

Steps:

a. Navigate to the installation directory of Guild Wars 2.

b. Locate the file uninstallation.exe or uninstallation000.exe.

unis000

c. Double-click the uninstaller and follow the instructions in the Guild Wars 2 Uninstaller Wizard.

Method 3: Elimination of Guild Wars 2 by system repair.

System Restore is a utility provided with the Windows operating system that helps computer users restore the system to its previous state and remove programs that interfere with the operation of the computer. If you created a System Restore Point before installing the program, System Restore can be used to restore the system and completely destroy unwanted programs such as Guild Wars 2. Before you perform a system restore, you need to back up your personal files and data.

Steps:

a. Close all open files and programs.

b. On the desktop, right-click Computer and select Properties. The system window is displayed.

c. Click on the System Protection button on the left side of the system window. The System Properties window is displayed.

System protection

d. Click on System Restore and the System Restore window will open.

System restoration

e. Select another restore point, and then select Next.

Restore files and system configurations

f. Select a date and time from the list and press Next. Please note that programs and drivers installed after the selected date and time may not work properly and may need to be reinstalled.

Target recovery point

Click Done when the Restore Point Confirmation window appears.

Validate the recovery point

Nine o’clock. Click Yes to reconfirm.

7 Confirmation of the restoration of the window 7 Confirmation of the restoration

Method 4: Remove Guild Wars 2 with antivirus.

Today, malware resembles normal computer applications, but it is much more difficult to remove it from a computer. These malicious programs infiltrate the computer using Trojans and spyware. Other malware, such as adware or potentially unwanted programs, are also very difficult to remove. They are usually installed in your system with free software such as videos, games or PDF converters. You can easily bypass the detection of antivirus programs in your system. If you cannot delete Guild Wars 2 like other programs, it is a good idea to check if it is malicious or not. Click on this tool and download it to scan for free

Method 5: Reinstall Guild War 2 to uninstall.

If the file required to delete Guild Wars 2 is damaged or missing, the program cannot be removed. Under these circumstances, reinstalling Guild Wars 2 can be very useful. Run the installation program on the original drive or in the startup file to reinstall the program. Sometimes you can use the installer to restore or uninstall the program.

Method 6: Use the deletion command displayed in the registry.

When the program is installed on your computer, Windows stores the settings and information in the registry, including the command to uninstall the program. You can try this method to remove Guild Wars 2. Please change the register carefully as any error can lead to a system error.

Steps:

a. Press and hold the Windows and R keys to open the Run command, type regedit in the field and press OK.

windows7 regedit

b. Go to the following registration key and find one of the Guild Wars 2:

HKEYY_LOCAL_MACHINE_SOFTWARE_Microsoft manifold.

c. Double-click the UninstallString value and copy the data from the value.

De-installation

d. Press and hold the Windows and R keys to open the Run command, paste the value data into the field and click OK.

e. Follow the Guild Wars 2 Uninstall Wizard.

Method 7: Removing Guild Wars 2 Using a third party Uninstaller

Manually removing Guild Wars 2 requires computer skills and patience. And no one can promise that a manual uninstallation will completely uninstall Guild Wars 2 and delete all files. And an incomplete uninstallation results in many unnecessary and invalid entries in the registry and has a negative effect on the performance of your computer. Too many unwanted files also take up free space on your hard drive and slow down your PC. It is therefore advisable to delete Guild Wars 2 using a trusted third party that can scan your system, identify all Guild Wars 2 files and completely delete them. Download this powerful third party remover below.

Uninstall and Remove Infineon TPM Professional Package Step by Step – 2023 Guide

De-installation

Do you need to uninstall the Infineon TPM Professional software package to solve some problems? Are you looking for an effective solution to completely delete all files from your PC? Don’t worry about it. On this page you will find detailed instructions on how to completely remove the Infineon TPM Professional package.

Possible problems when removing an Infineon TPM Professionalpackage .

* The Infineon TPM Professional software package is not listed under Programs and Features.
* You do not have sufficient access to uninstall the Infineon TPM Professional
package * The file required to complete the uninstallation could not be started.
* There’s been a mistake. Not all files have been successfully deleted.
* Another process using the file stops the deletion of the Infineon TPM Professional package.
* The files and folders of the Infineon TPM Professional software package are located on your hard disk after removal.

The Infineon TPM Professional package cannot be removed for many other reasons. Incomplete removal of an Infineon TPM Professional package can also cause many problems. It is therefore very important to remove the Infineon TPM Professional package completely and delete all files.

How do I uninstall the professional software package Infineon TPM Completley?

Method 1: Uninstall all Infineon TPM Professional programs and functions.

When a new part of the program is installed on your system, the program is added to the list under Programs and Features. If you want to uninstall a program, you can go to the section Programs and Features. So, if you want to uninstall an Infineon TPM Professional package, the first solution is to uninstall it using programs and features.

Steps:

a. Open programs and functions.

Windows Vista and Windows 7

Press Start, type Uninstall program in the Search for programs and files , and then click on the result.

Delete search7

Windows 8, Windows 8.1 and Windows 10.

Open the WinX menu by holding the buttons Windows and X together and then pressing Programs and Functions.

Win X 10 menu window

b. Find the Infineon TPM Professional software package in the list, click on it and then click the Remove button to start uninstalling.

delete

Method 2: Uninstall an Infineon TPM Professional package with an uninstaller.exe.

Most computer programs have an executable file called uninst000.exe or uninstall.exe or something similar. You will find these files in the installation folder of the Infineon TPM Professional software package.

Steps:

a. Navigate to the installation folder of the Infineon TPM Professional software package.

b. Locate the file uninstallation.exe or uninstallation000.exe.

unis000

c. Double-click the uninstaller and follow the instructions of the Infineon TPM Professional Package Uninstaller.

Method 3: Remove the Infineon TPM Professional package per System Restore.

System Restore is a utility provided with the Windows operating system that helps computer users restore the system to its previous state and remove programs that interfere with the operation of the computer. If you created a System Restore Point before installing the program, you can use System Restore to restore the system and completely destroy unwanted programs such as the Infineon TPM Professional software package. Before you perform a system restore, you need to back up your personal files and data.

Steps:

a. Close all open files and programs.

b. On the desktop, right-click Computer and select Properties. The system window is displayed.

c. Click on the System Protection button on the left side of the system window. The System Properties window is displayed.

System protection

d. Click on System Restore and the System Restore window will open.

System restoration

e. Select another restore point, and then select Next.

Restore files and system configurations

f. Select a date and time from the list and press Next. Please note that programs and drivers installed after the selected date and time may not work properly and may need to be reinstalled.

Target recovery point

Click Done when the Restore Point Confirmation window appears.

Validate the recovery point

Nine o’clock. Click Yes to reconfirm.

7 Confirmation of the restoration of the window 7 Confirmation of the restoration

Method 4: Uninstall the Infineon TPM Professional package with antivirus software.

Today, malware resembles normal computer applications, but it is much more difficult to remove it from a computer. These malicious programs use Trojans and spyware to infiltrate the computer. Other malware, such as adware or potentially unwanted programs, are also very difficult to remove. They are usually installed in your system with free software such as videos, games or PDF converters. You can easily bypass the detection of antivirus programs in your system. If you cannot remove an Infineon TPM Professional package like other programs, it is useful to check whether or not it is malicious. Click on this tool and download it to scan for free

Method 5: Reinstall the Infineon Professional TPM package to remove it.

If the file required to uninstall the Infineon TPM Professional software package is damaged or missing, the program cannot be uninstalled. Under these circumstances, reinstalling the Infineon TPM Professional software package may be a good idea. Run the installation program on the original drive or in the startup file to reinstall the program. Sometimes you can use the installer to restore or uninstall the program.

Method 6: Use the deletion command displayed in the registry.

When the program is installed on your computer, Windows stores the settings and information in the registry, including the command to uninstall the program. You can try this method to remove the Infineon TPM Professional package. Please change the register carefully as any error can lead to a system error.

Steps:

a. Press and hold the Windows and R keys to open the Run command, type regedit in the field and press OK.

windows7 regedit

b. Go to the following registration key and find one of Infineon’s professional TPM software packages:.

HKEY_LOCAL_MACHINE_SOFTWARE_Microsoftraam…

c. Double-click the UninstallString value and copy the data from the value.

De-installation

d. Press and hold the Windows and R keys to open the Run command, paste the value data into the field and click OK.

e. Follow the instructions of the wizard to remove the Infineon TPM Professional package.

Method 7: Removing the Infineon Professional TPM package with a third party remover.

Manually uninstalling the Infineon TPM Professional software package requires computer skills and patience. And no one can promise that a manual uninstallation will completely uninstall the Infineon TPM Professional package and delete all files. And an incomplete uninstallation results in many unnecessary and invalid entries in the registry and has a negative effect on the performance of your computer. Too many unwanted files also take up free space on your hard drive and slow down your PC. It is therefore recommended to uninstall the Infineon TPM Professional package using a trusted third party uninstaller that can scan your system, identify all files in the Infineon TPM Professional package and remove them completely. Download this powerful third party remover below.